This post will show you how to set up the complete process automation to bring offline conversions to your Microsoft Advertising account, just by using Google Ads Scripts and Google Sheets. In other words, you need no developer skills to solve this automation task and all required tools are completely free.

What are offline conversions?
You easily record your customers’ orders and actions on the site with traditional conversion tracking methods. However, what about their actions outside of your site? The purchases they complete by paying at a point of sale? Offline conversions come to our rescue here. With offline conversions, you can link customers’ actions on the site with their offline actions, and have conversions that occur offline also be factored in.
Importing offline conversions
Imagine collecting offline conversions in Google Ads. When you want to see these conversions in Microsoft Advertising, you’ll need to import them to an extent. Fortunately, Microsoft Advertising makes it easy for us and offers an import feature. However, what if you need to do this on a regular basis, not just once? In fact, you’ll need it in many cases. Taking a few hours a day to import your daily offline conversions, exporting these conversions from Google Ads, formatting your file, and uploading it to Microsoft Advertising will be a laborious and time-consuming activity. No need to worry: You can automate this with our solution.
Setting up Google Analytics
When you want to add your offline conversions to Microsoft Advertising, the columns you will need Microsoft Click ID, Date/Time, Offline Conversion Name, and Offline Conversion Value. So make sure you add the Microsoft Click ID as Custom Dimension to Google Analytics and store it. If you aren’t collecting Microsoft Click IDs on your Google Analytics already, you can follow the guide below to start.
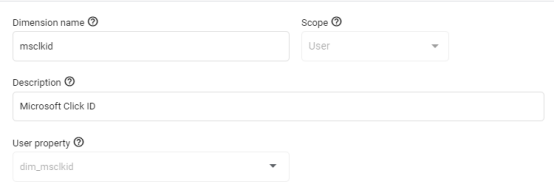
Create custom dimension to store Click ID
Create new custom dimension on Google Analytics.
- Visit Google Analytics home page.
- Click “Configure” on the left panel.
- Select the “Custom definitions” menu item.
- Create new custom dimension for Microsoft Click ID.
- Type User Property/Parameter to use it on Google Tag Manager (“dim_msclkid” > for example)
- Note your User Property/Parameter to use it on next steps.
Finally, your new custom dimension should look as below:
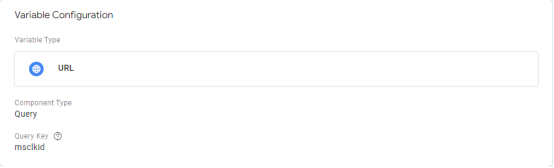
Create variable on Google Tag Manager
Go to Google Tag Manager to start making necessary adjustments.
- Navigate to “Variables” on the left panel.
- Click “New” to create new variable to store Microsoft Click ID.
- Choose “URL” as variable type.
- Choose “Query” as component type.
- Type “msclkid” for query key.
- Name your variable and save it. (“Microsoft Click ID” for example)
Finally, your new variable should look as below:
Now that variable is ready, we should create new tag to send this URL query to the Google Analytics as custom dimension.
Create tag on Google Tag Manager
Follow steps below if you don’t have any GA4 Configuration tag already. If you have one, you can skip creating new tag and simply start from 5th list item below.
- Navigate to “Tags” on the left panel.
- Click “New” to create new tag.
- Click “Tag Configuration” panel and select “Google Analytics: GA4 Configuration” (Assuming you are using GA4)
- Type your Google Analytics tracking ID for measurement ID field.
- Click on the “User Properties” and click “Add Row” to add new user property.
- For the property name field, place your “User Property/Parameter” name you created before on Google Analytics (“dim_msclkid” for example)
- For the value field, click the plus button next to the textbox and select the variable you created before for Microsoft Ciick ID (“Microsoft Click ID” for example)
- Click the “Triggering” panel below and choose the trigger you need. (“All pages” for example)
- Name your new tag, and save it.
Finally, your new tag should look as below :
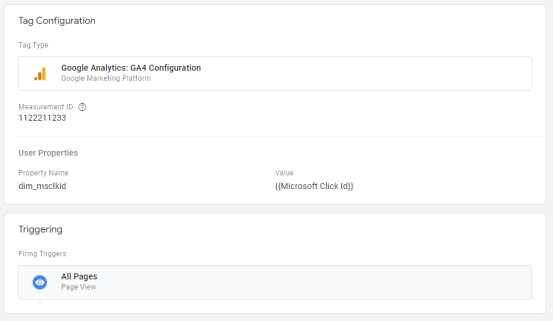
Remember, you may want to edit your tag settings according to your needs.
Automating Microsoft Advertising offline conversions uploads

Create Google Sheet
Go to Google Sheets and create a new empty sheet which will store your reports in next steps.
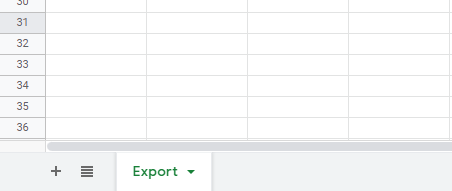
Create new sheet in your document, and name it “Export” as below.
After you create “Export” sheet, copy URL on the address bar of your browser and store your <SpreadSheet ID> and <‘Export’ sheet ID> somewhere. Next steps, you’ll need that. URL should look something as below:

Google Ads Script for fetching and storing conversion reports
Thanks to Google Ads Scripts, we can easily and effortlessly fetch our Google Analytics reports with the help of a few lines of code. That is, the first thing we’ll need is a Google Ads Script that will bring us our Google Analytics reports.
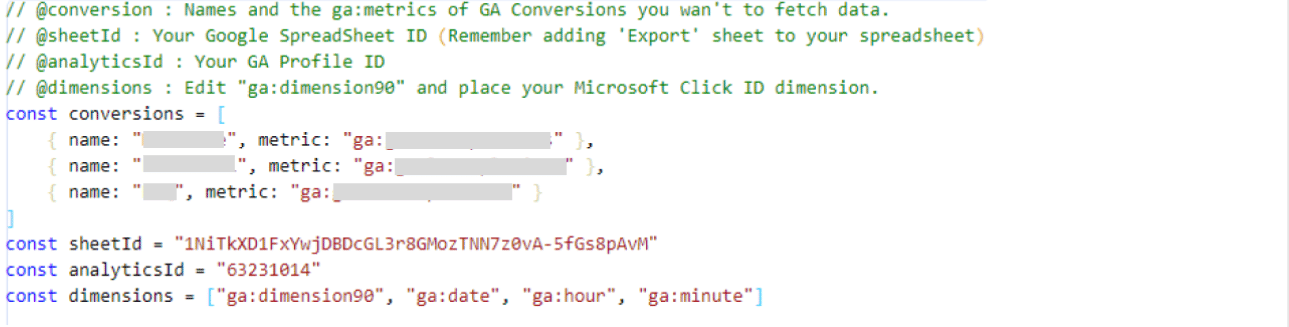
//Edit above
//Place your Offline Converisons names and ga:metrics.
const conversions = [
        { name: "conversion name 1", metric: "ga:goalmetric1" },
        { name: "conversion name 2", metric: "ga:goalmetric2" },
        { name: "conversion name 3", metric: "ga:goalmetric3" }
    ]
    //Your Google SpreadSheet ID (Remember adding 'Export' sheet to your spreadsheet)
const sheetId = "1NiTkXD1FxYwjDBDcGLyr8GMozTNN7z0vA-2fG78pAvM"
    //Edit your Google Analytics Profile ID
const analyticsId = "69332014"
const spreadsheet = SpreadsheetApp.openById(sheetId);

//Edit "ga:dimension90" and place your Microsoft Click ID dimension
const dimensions = ["ga:dimension90", "ga:date", "ga:hour", "ga:minute"]
var sheetName = ""
const headers = [
    'Microsoft Click ID',
    'Conversion Name',
    'Conversion Time'
]
const includeEmptyRows = false
let willContinue = true

function main() {
    //Run of each conversions on the list
    conversions.forEach((c, index) => {
            runReport(analyticsId, c, index)
        })
        //Get Export sheet.
    var exportSheet = spreadsheet.getSheetByName('Export').getRange("A:D");
    //Clear content before adding daily data
    exportSheet.clearContent();
    const today = new Date();
    const dayAgo = new Date(today.getTime() - 1 * 24 * 60 * 60 * 1000);
    var range = spreadsheet.getSheetByName(dayAgo.toDateString()).getDataRange()
    range.copyTo(exportSheet.getCell(1, 1));
    if (willContinue) {
        console.log("Todays data generated successfully on Google Sheet. :" + dayAgo.toDateString())
        console.log("Rest of the process will be handled automatically with scheduled uploads on Microsoft Ads.")
        console.log(">>>> Visit link for more information: https://ui.ads.microsoft.com/campaign/vnext/offlineconversionsschedule?")
    } else {
        console.log("Seems todays data generated already. See : " + dayAgo.toDateString())
        console.log("Rest of the process will be handled automatically with scheduled uploads on Microsoft Ads.")
        console.log(">>>> Visit link for more information: https://ui.ads.microsoft.com/campaign/vnext/offlineconversionsschedule?");
    }

    var sheet = spreadsheet.getSheetByName("Export");
    var exportUrl = `https://docs.google.com/spreadsheets/d/${sheetId}/export?format=csv#gid=${sheet.getSheetId()}`
    console.log("Remember using this URL for scheduled upload file url on Microsoft ads : ")
    console.log(exportUrl)
}

function runReport(profileId, c, index) {
    try {
        var sheets = spreadsheet.getSheets()
        let data = [];
        const today = new Date();
        const dayAgo = new Date(today.getTime() - 1 * 24 * 60 * 60 * 1000);
        const startDate = "yesterday"
        const endDate = "yesterday"
        const tableId = 'ga:' + profileId;
        const metric = c.metric;
        const options = {
            'dimensions': dimensions.join(","),
            'include-empty-rows': includeEmptyRows
        };
        const report = Analytics.Data.Ga.get(tableId, startDate, endDate, metric,
            options);

        Logger.log('Fetching GA Report : ' + c.name);
        if (!report.rows) {
            Logger.log('No rows returned : ' + c.name);
            return;
        }
        if (index == 0) {
            var hasExportsSheet = false
            sheets.forEach(s => {
                let name = s.getName()
                if (name == dayAgo.toDateString()) {
                    willContinue = false
                    return false
                }
                if (name == "Export") {
                    hasExportsSheet = true
                }
            })
            if (!hasExportsSheet) {
                spreadsheet.insertSheet("Export");
            }
        }
        if (!willContinue) {
            return false
        }
        let sheet
        if (index == 0) {
            var ss = spreadsheet.insertSheet(dayAgo.toDateString());
            spreadsheet.setActiveSheet(ss)
            sheet = spreadsheet.getActiveSheet();
            sheetName = dayAgo.toDateString()
            sheet.appendRow(headers);
            console.log("Today's data not uploaded yet. Processing now...")

        } else {
            sheet = spreadsheet.getSheetByName(dayAgo.toDateString());
        }
        console.log(`Found rows for ${c.name}: ${report.rows.length}`)
        report.rows.forEach(d => {
                data.push([d[0], c.name, formatDate(d[1], d[2], d[3])])
                sheet.appendRow([d[0], c.name, formatDate(d[1], d[2], d[3])]);

            })
            // Append the results.

    } catch (err) {
        console.log(err)
        runReport(profileId, c, index)
    }
}

function formatDate(day, hour, min) {
    var formattedDate = `${day.slice(0, 4)}-${day.slice(4, 6)}-${day.slice(6, 8)} ${hour}:${min}:00-0700`
    return formattedDate
}
Important: Remember editing the parameters on script:
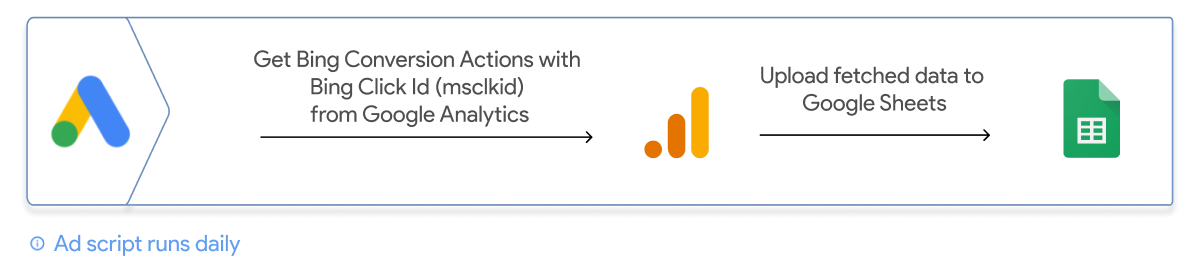
This script simply works like this:
1. It fetches the Google Analytics report with the metrics and dimensions we specified.
2. Format this report as required in Microsoft Advertising and save it daily in Google Sheet.
Schedule your script to run on daily basis.

Important: Make sure that the script will run each day BEFORE Microsoft Advertising’s upload process. To make sure of it, you can simply schedule this script to run 1 or 2 hours before Microsoft Ads Scheduled upload.
Create offline conversion goals on Microsoft Advertising if they don’t exist
The conversions in the file to be uploaded must also be included in Microsoft Advertising. If you have missing conversion goals, be sure to visit the conversion goals page and create them.

Setting up Microsoft Advertising offline conversions scheduled upload
Visit the offline conversions page in Microsoft Ads and switch to the “Schedule” tab. Start creating a new schedule by clicking the “+Schedule” button.

Set necessary fields before saving.
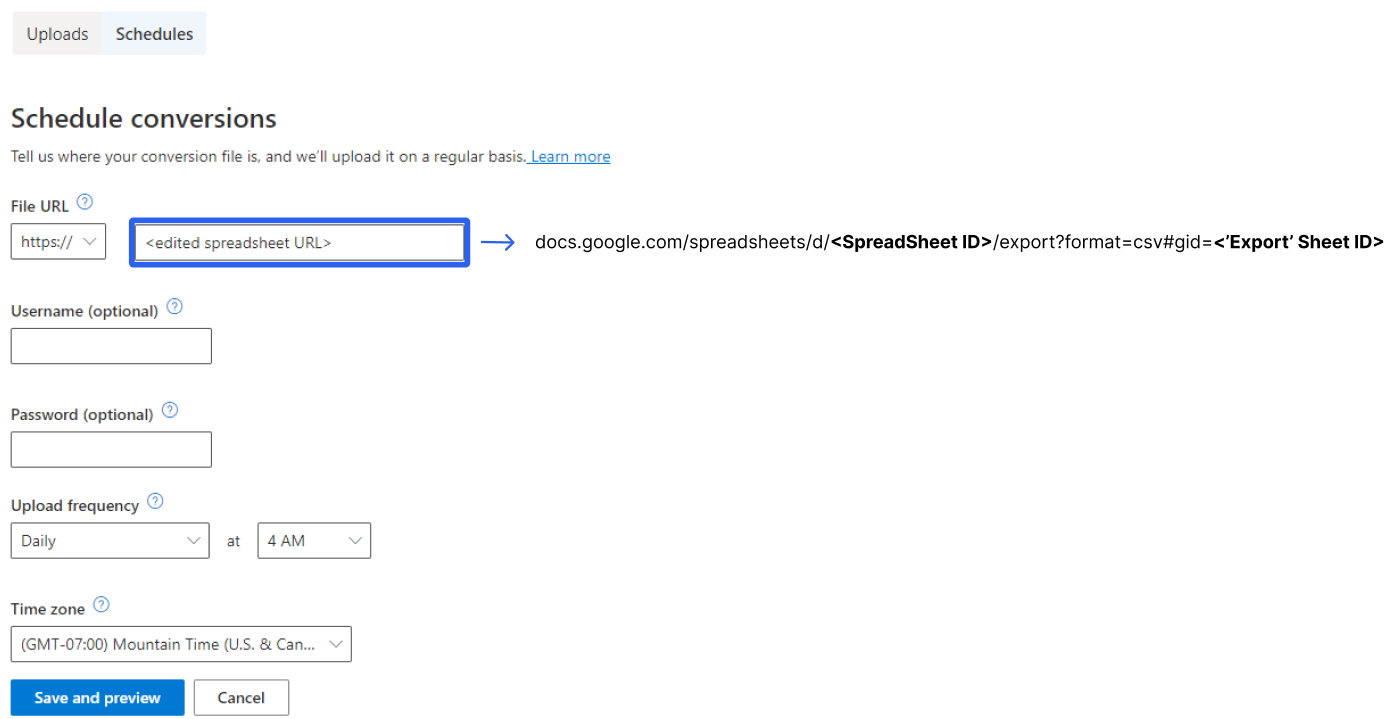
Important :
- Make sure URL for your file is as below and replace <SpreadSheet ID> and <‘Export’ Sheet ID> with the IDs you stored previous steps.
docs.google.com/spreadsheets/d/<SpreadSheet ID>/export?format=csv#gid=<’Export’ Sheet ID>- Example:
docs.google.com/spreadsheets/d/1NiTkXD1FxYwjDADcGLyr8GMozzNR7z0vA-5fG78pAvM/export?format=csv#gid=1936801127
- Make sure Google Sheet document is publicly accessible.
- Make sure your upload frequency time is later then your Google Ads Script’s frequency. At least 1-2 hours, because Google won’t promise that script will run exactly on the desired hour.
Congratulations! You automated your Microsoft offline conversion reports
Once all is done, you’ll now be able to automatically export your Google Analytics offline conversions to Microsoft Advertising. On a daily basis, this process will be completed at the times you specify. Remember, the data for the previous day will be loaded each day.
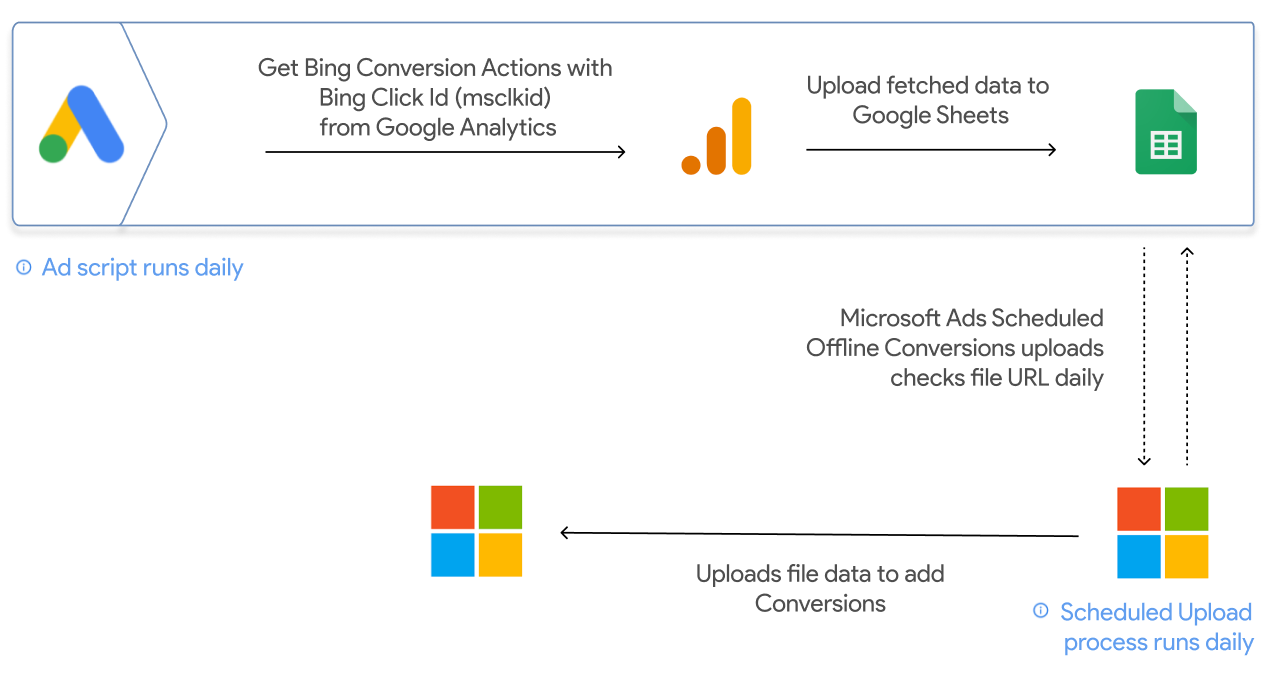
The whole process will work as below:
Are you interested in more PPC Automations like that? Feel free to schedule a meeting with us to talk about your use case.