As well as creating an effective ad, closely monitoring ad performance and measuring its impact on sales is also a game changer. Let’s check this step-by-step guidance on how to create a valid file format and test and upload your offline conversions.
What is GCLID?
GCLID (also known as Google Click Identifier) is a parameter that works with Google Ads and Google Analytics. When used with Google Analytics, it plays an important role in distinguishing clicks on your ads with Google Ads. It tags clicks by source, so you can track more useful information about visitors behavior and the performance of your ads.
To learn more about GCLID and how it works with Google Analytics, we recommend that you take a look at our previous posts: How to add Google Click ID (GCLID) to Google Analytics
What are offline conversions?
If you only track the conversions of your visitors and potential customers from your website, you’re missing the big picture about your ads. Did you know that conversions can also happen offline? For example, a potential customer might click on your ad to talk to your sales representative instead of filling out a form on your website. After a customer finds your company through your ad, they may visit a physical store of your company in person to make a purchase. If you want to have a bigger picture of how your ads are impacting your sales, it’s definitely worth considering the offline conversions as well.
How to create new offline conversion on Google Ads
Before importing an offline conversion file, you need to create a conversion action. You can follow these steps to easily create your conversion action right away.
1. Sign in to your Google Ads account.
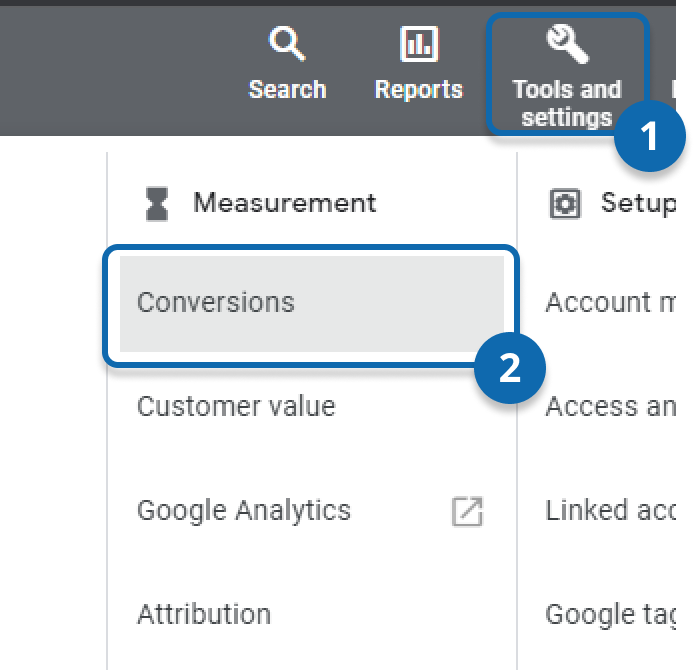
2. Select “Tools” from the top menu, then “Conversions”.

3. Click the “New Conversion Action” button.
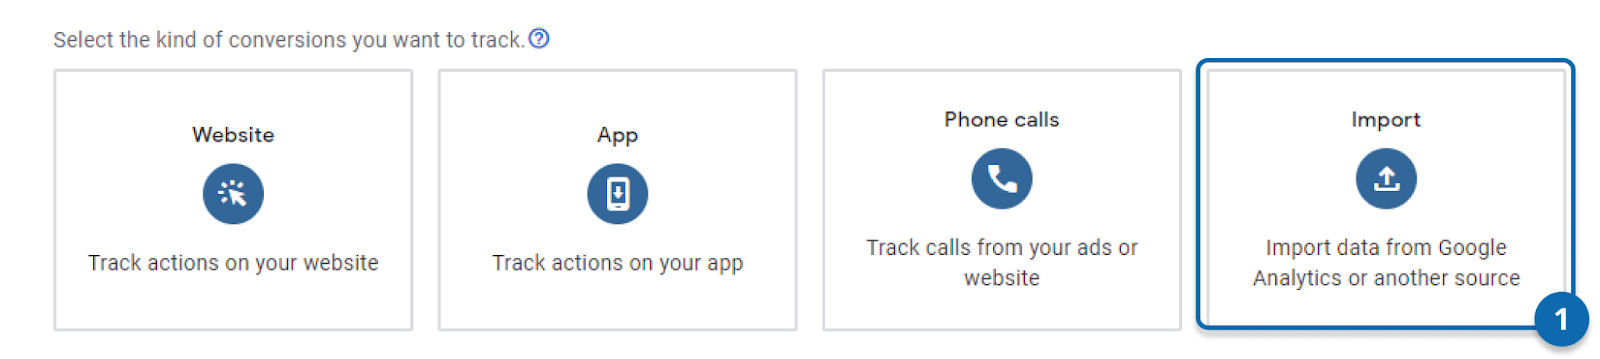
4. Select “Import” as the conversion type you want to track.
5. Select “Other data sources or CRMs” as the import option, then check “Track conversions from click”.
6. Click the “Continue” button to continue.
7. In the “Goal and action optimization” section, select the goal you think best fits the conversions you’re importing.
8. Set a name for your conversion action. Do not forget to take note of this name in full. You will need it when creating the import file.
9. Choose the value type that fits your conversions.
10. In the “Count” section, specify how to count conversions per click.
11. In the “Click-through conversion window” section, specify how far back you go when saving your conversions. Remember, the earliest allowed date when importing conversions is 90 days ago.
12. Leave the “Attribution model” as the recommended “Data driven”.
13. Continue by clicking the “Create and continue” button.
14. For “Method for measuring offline conversions”, select “Google Click Identifiers” .
15. For “Import offline conversions”, select the upload option.
16. Click “Done” to complete the creation of the conversion action.
An important point to note is that after creating a new conversion action, you need to wait between 4 and 6 hours to import the values of this conversion action.
What are GCLID offline conversions?
You need to import an Offline conversion file with a GCLID to track which visitors are performing conversions while importing offline conversions. In order to pass this process, you first need to make sure that you’re tracking the GCLIDs.
If you don’t know how to track GCLIDs, we suggest you take a look at our previous post on this subject: How to add Google Click ID (GCLID) to Google Analytics
How to upload GCLID offline conversions to Google Ads
Importing offline conversions with GCLID isn’t as difficult as one might think. By following a few simple steps we outlined below, you can complete your setup in a few minutes and start seeing what’s happening in the offline world after someone clicks on your ads.
First things first, you must first make sure you have a valid file to import.
How to format upload file
The majority of problems when importing an offline conversion file are due to not having a file in the correct format. Therefore, it’s necessary to prepare an offline conversion import file in the correct format.
First, let’s take a look at the columns that should be in the file.
Available Columns to use
Google Click Id
The GCLID parameter of the visitor performing the offline conversion. If you want to import an offline conversion containing a GCLID, you must use this field.
Conversion Name
The name of the conversion action to which you want to transfer the conversion. Be sure to pay attention to capitalization and spell this name as you see it on the “Conversions” page. It’s mandatory to use this field.
Conversion Time
The time of offline conversion occurred. Make sure you enter this field in the correct format.
One of the most common correct formats for this field stands out as “yyyy-MM-dd hh:mm-ss+z”. For example “2022-08-30 11:51:00 -0700”. If you find it difficult to convert this column to the correct format, you can browse this table to find a more suitable format for you. It’s mandatory to fill this field.
Conversion Currency
The currency of the conversion value (if any) you would like to import. Be sure to use a 3-character “ISO 4217 currency codes” when filling in this field. For example; “USD” or “EUR”. This field is optional.
Conversion Value
A number that indicates the value of your conversion. It indicates a coin value or an integer. Using this field is optional, and if you leave it blank the default value you set when creating the conversion goal will be used.
Prepare Upload File
Now that you know about the required columns and the correct format, you can start creating an import file.
1. Create a new .csv file.
2. Add the columns specified in the previous step as headings in the first row.
3. Include your offline conversion data in each row in the correct format.
4. Give your .csv file a name and save it.
5. Once done, you should have a .csv file that looks like this. Make sure the titles are spelled exactly the same.

How to test offline conversions upload file
- Login to your Google Ads account.
- Click “Tools and settings” on the top right menu, then click on “Conversions”.
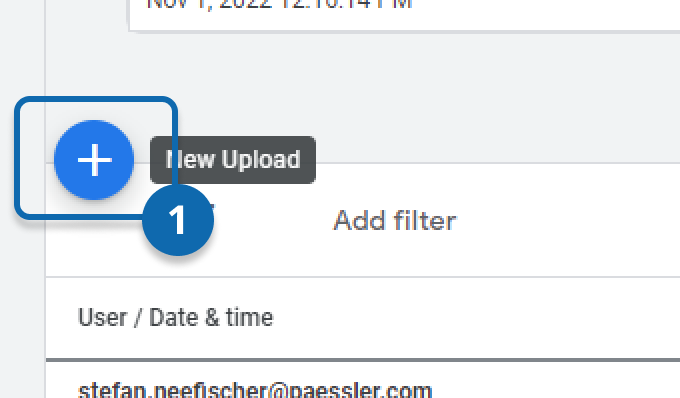
- Click on “Upload” section on the left side banner. Then, click the “+” button to start new upload.
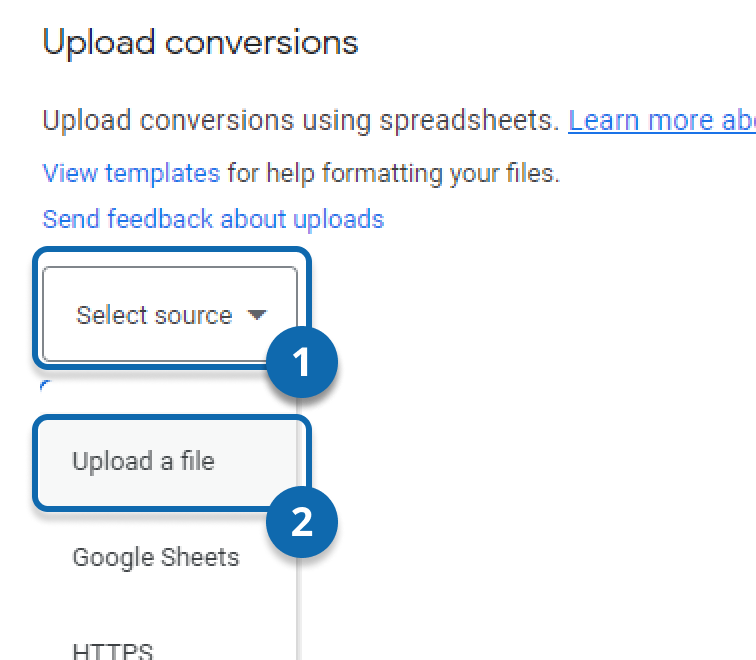
4. Click “Select source”, then select “Upload a file” from the menu.
5. Click on the “Select a file from your computer” button to select the .csv file you created in previous steps.
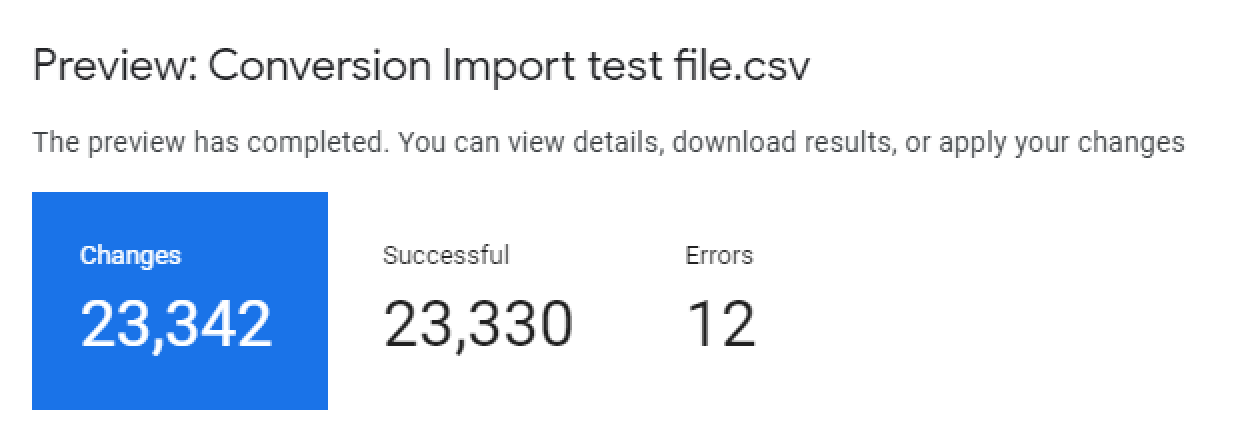
6. After you select the import file, click “Preview” button to start previewing and testing your import file.

The preview process will be completed in a few seconds and the details of the uploaded file will be displayed. You can click on “Errors” to see the rows where the error occurred. In the following sections of this article, we’ll talk about the most common errors when importing offline conversions. If you encounter errors in your preview file, we recommend that you continue reading our article.
How to upload offline conversions upload file
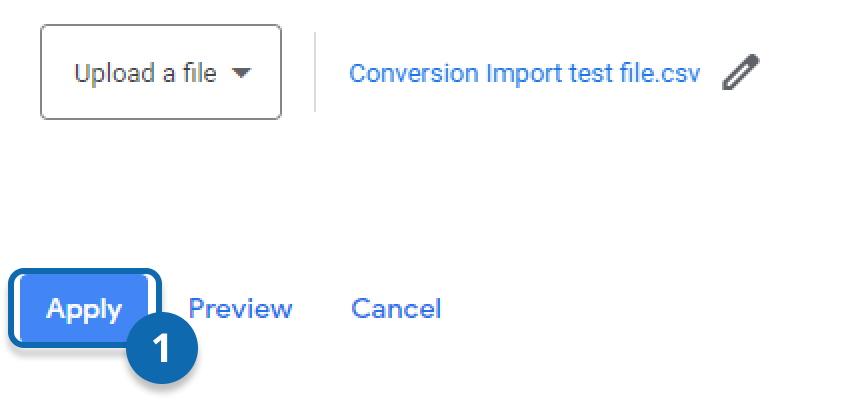
After previewing the offline conversion import file and correcting any errors found, you can perform the import. These steps are almost exactly the same as the previous section. You just have to click the “Apply” button instead of the “Preview” button in step 6.
How to Schedule Offline Conversions Upload File
To import your offline conversions on a regular basis, not just once, Google Ads comes to your aid. Thanks to the “Schedules” option, you can regularly import your offline conversions effortlessly by using the import file you have prepared before.
You can use a URL from a Google Sheet file or a .csv file available online to do this. Google Ads will import this file at intervals you specify, so any new offline conversions you add to the file will be imported with each run.
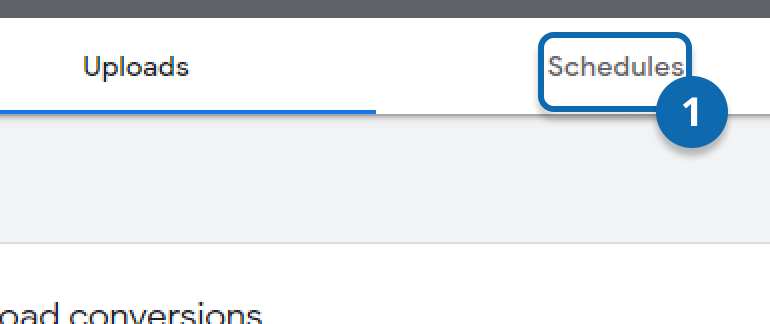
1. On the Conversions page, switch to the “Schedules” tab.
2. Click the “+” button to create a new schedule.
3. Click to the “Source” to specify the source of the file you want to import.
IMPORTANT: If you’re using a Google Sheet file, make sure that you share your file with the email address shown on the upload screen or that your file is accessible to everyone.
4. Link your Google Sheet (if source is Google Sheets) or type the URL of .csv file (if source is HTTPS)
5. Select frequency and time.
6. Click “Save & Preview”.
After a few seconds, the preview will be completed. The file at the address you specify will now be imported for offline conversions on a regular basis at the intervals you specify.
What are the most common errors when uploading offline conversions?
A conversion with this timestamp and GCLID already exists.
It’s one of the most common mistakes when importing offline conversions into Google Ads. It means that the offline conversion you’re trying to import on the row where the error occurred has already been imported. For example, you imported your offline conversions for the time range “timestamp value” between 17.11.2022 and 24.11.2022. If you later want to import only the date 18.11.2022 from the same conversions, you’ll encounter this error because the conversions for this date have already been imported.
However, the point to note here is that you always have a chance to import an offline conversion from the past. Only offline conversions belonging to the same timestamp cannot have the same GCLID.
This click is too old
Unfortunately, there are some limitations when importing offline conversions into Google Ads. One of them is that you can import offline conversions up to 90 days back most.
This means that if a line’s “timestamp” value points to more than 90 days old in your import file, that line will get the error “this click is too old”. You may need to remove these lines to fix this. To avoid the “this click is too old” error, your offline conversion import file must not contain any conversions older than 90 days.
The conversion can’t occur before the click.
What you need to do to resolve this error is to make sure that the timestamp column in your Google Ads offline conversion import file is correct. Usually this error is caused by mistakes made during time zone conversions. For example, if you have a row with conversion that should be -7000 in time zone as +7000, the conversion you’re trying to import will not be able to be imported because its time has not even come yet, and you will encounter the “The conversion can’t occur before the click” error.
To avoid “The conversion can’t occur before the click.” error, you should double check the timestamp column, make sure you’re converting the time zone as expected and make sure that the time zone you specify is the same as the time zone where the conversion took place.
We’re still processing this click’s information, please try again after 4-6 hours
If you’re encountering this error, you need to give Google Ads some more time to start processing your newly created conversion actions.
If you create a new conversion action and try to import an offline conversion file after waiting long enough, you may unfortunately encounter the “We’re still processing this click’s information, please try again after 4-6 hours” error. The only thing you can do to fix this error is to try again after waiting a few hours, as the error message clearly states.
We can’t find this conversion name in the target account
The first thing to check for resolving this error is whether the offline conversion name is spelled correctly in the import file. Remember, the conversion name in the “offline conversion name” column must be EXACTLY the same as your one conversion action, including capitalization and punctuation.
If you’re sure the names match, the next thing to check is whether the click from the GCLID belongs to the account you’re importing from. If this click is from an MCC, and you’re importing offline conversions for an account belonging to that MCC (My Client Center), you should make sure that “cross-account conversion tracking” is enabled on that MCC. If you do not know how to do this, you can take a look at this document prepared by Google.
Conversion date precedes click date
Similar to the “the conversion can’t occur before the click.” error, this error indicates that the click for the GCLID occurred later than the time you specified. To import the offline conversion, the click must have occurred before the value in your “timestamp” column. To resolve the “Conversion date precedes click date” error, add 1-2 days to your conversion time on your upload, or check if the time zone is set correctly.