Without data-driven results, it’s challenging to properly understand your competitors because data never lies about ad strategies. With the right moves, you can overtake other brands.
The Google Auction Insights Report is a priceless tool that gives insights into your competitors’ performance. However, accessing and analyzing this data can be tedious and time-consuming, especially when managing multiple accounts with large keyword sets.
We all want data, and we don’t want to spend days on every process. To do so, we have a practical solution at hand to automate that process.
This way, you’ll get deeper insights and make more informed decisions to enhance your advertising efforts.
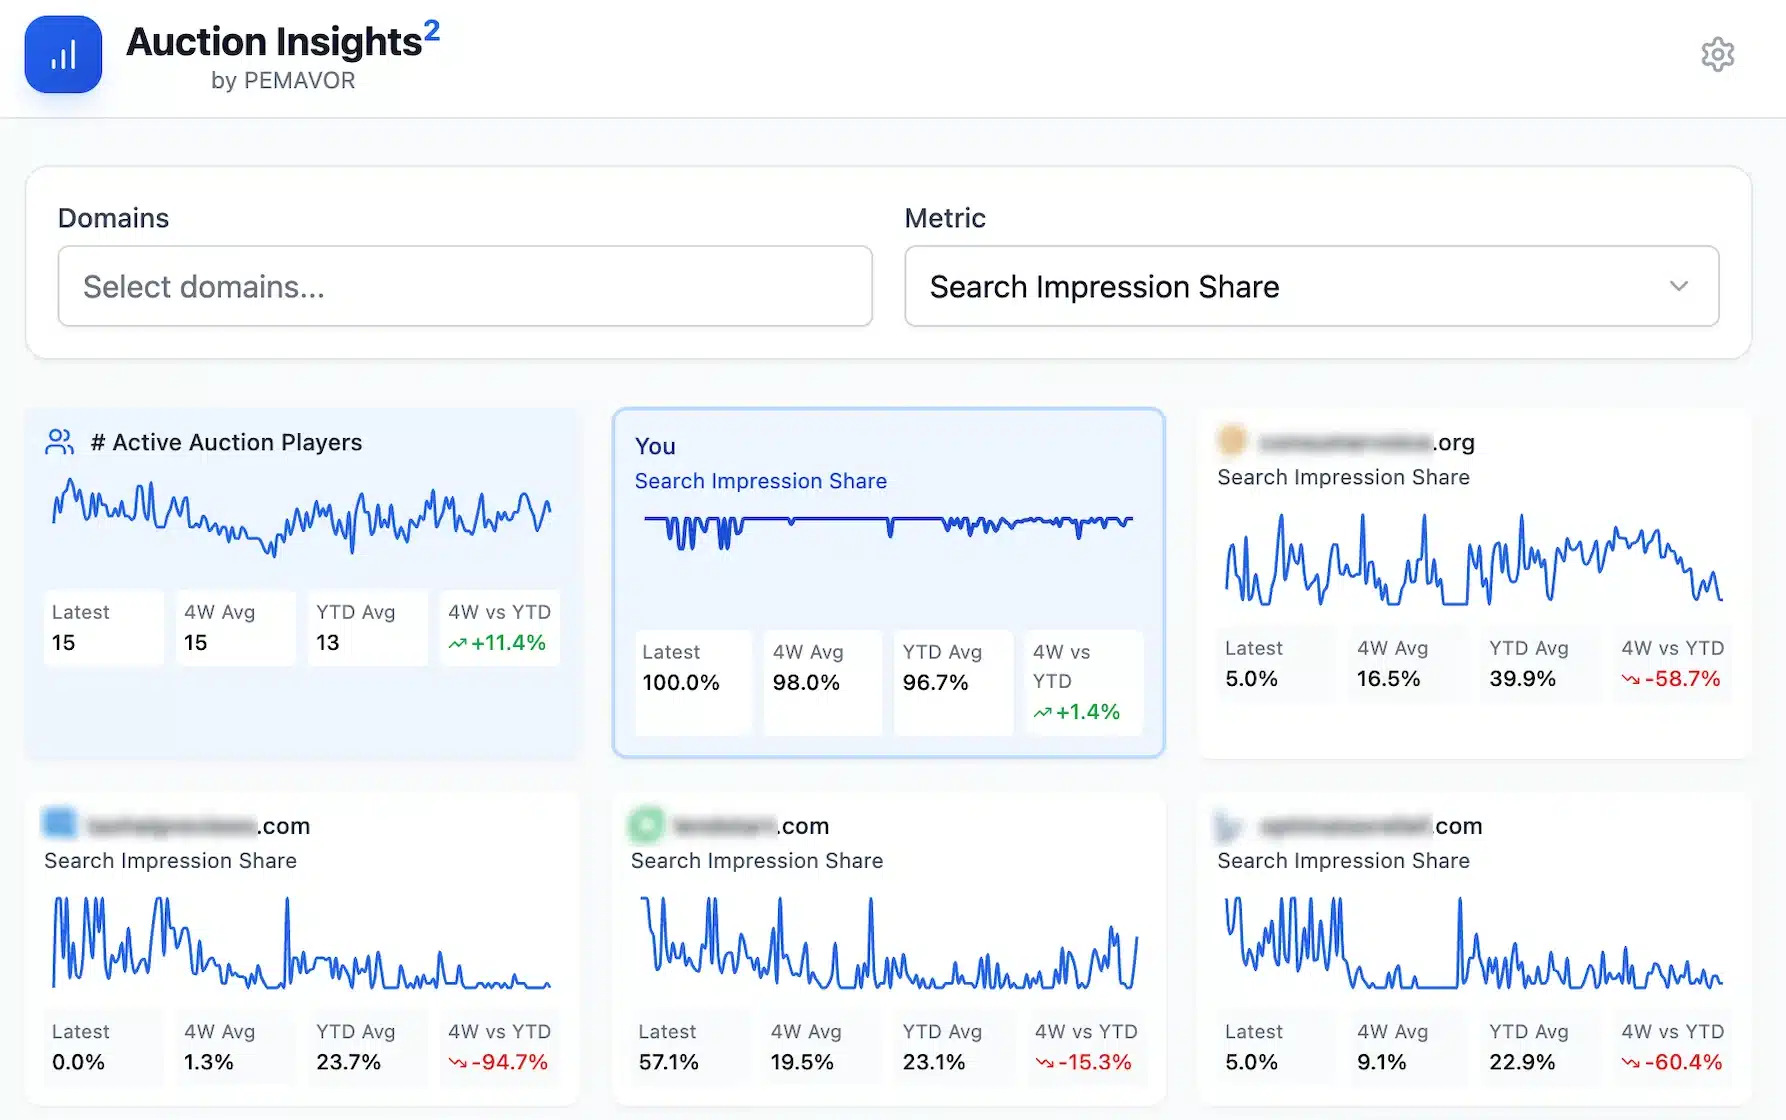
Looking for a simpler way to analyze Auction Insights data without relying on scripts or complex BigQuery setups? Try our Auction Insights Tool. Upload your Google Ads Auction Insights CSV file and visualize key metrics instantly, such as Search Impression Share, Top of Page Rate, and more. No scripts, no Looker Studio dashboards—just actionable insights in minutes.
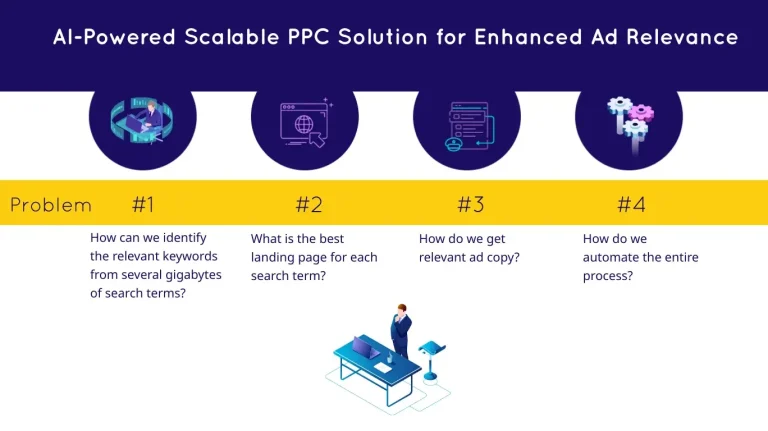
What is the Auction Insights Report?
Auction Insight data is useful to understand your competition in Google Ads. It’s possible to do this at the keyword level. This data can explain why your Cost-per-Clicks (CPCs) have increased over time. You also get insights into your competitors’ budgets—and how they change over time. However, this valuable auction data isn’t available through the Google Ads Auction Insights API or the Google Ads Reporting API.
Why should you automate the Auction Insights Report Export?
Regularly, you should check this valuable data to not miss any winning opportunities. However, it’s time-consuming to enter the data manually for multiple Google Ads account owners (with large keyword sets). If you want to analyze the auction data at the keyword level, the file gets large quickly and can be difficult to analyze in tools like Excel. What about Google Ads Export to BigQuery? The data immediately becomes more meaningful. Even with large data sets, you can create dashboards with Google Looker Studio to gain auction insights.
Required Services: How to automatically save the Auction Insight data to Big Query
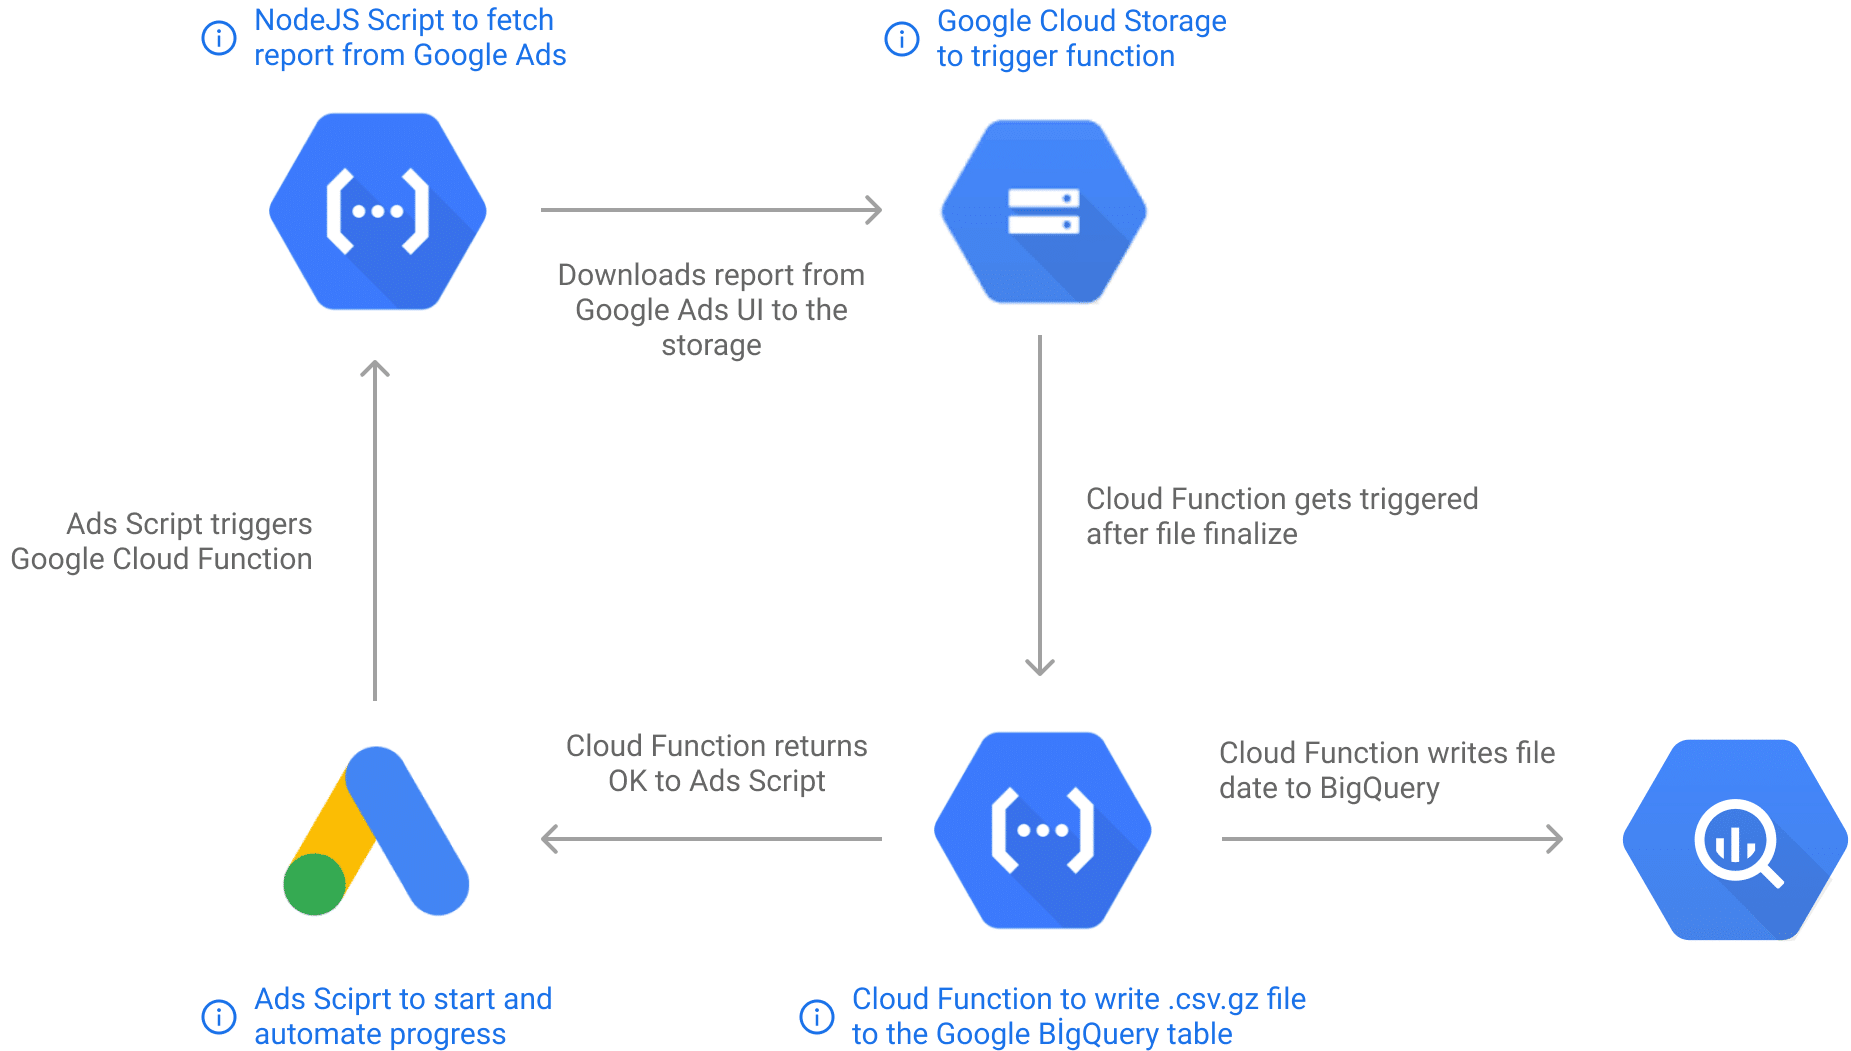
Google doesn’t yet allow access to Auction Insight data with Google Ads Insights Script or Ads API. For this reason, we need to create a workaround to get this data in an automated way. Before we go into the components used in our solution, here we explain in simple terms:
First, you need to automate the processes you normally perform in your browser to access the Google Auction Insight data. After downloading the files, you can then use the official APIs to store the data in cloud storage and analyze it with BigQuery.
Google BigQuery
BigQuery, inexpensive and powerful, can be easily used as a data source in Google Looker Studio. It’s the database where we want to store the Auction Insights report data.
Google Cloud Storage
The Auction Insight data is so large. So Google Cloud Storage is required to save the reports in .csv.gz format and trigger the script in Google Cloud Function to write data to Google BigQuery.
Google Cloud Functions
It’s used to run the NodeJS script that retrieves the report and writes the reports to Google BigQuery.
Google Ads Script
It’s used to automate the process and monitor the results of Google Ads UI.
What is the full auction insight extractor solution?
Necessary Scripts
Google Cloud Functions

Auction Insights Report Scraper from Google Ads UI [NodeJS Script]
When you run the Headless mode with Puppeteer in the Google Cloud Functions, the script fetches the download link of the Auction Insight report and downloads the remote file to the cloud storage on Google storage.
You must sign in to Google Ads before you can pull reporting data from the ads UI. If you want to do this in Google Cloud Functions, you might run into some issues. Since it’s detected as a foreign device, you might have to take some extra steps for your safety. This makes it impossible to log into the cloud if you’re only using Headless Chrome. This is where the “User Data Directory” comes to our rescue.
Let’s take a look at how you can prepare your data directory to automate the Google Ads sign-in process with Headless Chrome. You should follow the steps below:
- Close the Google Chrome browser if it’s running.
- You need to clear your cache folder to reduce the file size. Warning: this will delete all history, saved and cached data in your Chrome Browser. Consider backing the directory up before proceeding with the following steps. For Windows:
- Open the directory
%LOCALAPPDATA%\Google\Chrome\User Data - Back everything up in this directory.
- Delete everything in this directory.
- For more info about other OS visit: https://chromium.googlesource.com/chromium/src/+/master/docs/user_data_dir.md
- Open the directory
- Open Google Chrome, navigate to https://ads.google.com and log in to your account like as usual.
- Close Google Chrome after you have successfully logged in.
- Go to
%LOCALAPPDATA%\Google\Chrome\User Dataagain. Copy everything into this folder and back them up to somewhere you’ll remember. You’ll need it later. - Done! This is the data you need to log in to Google Ads with Headless Chrome.
Now that we have the directory of user data, we can proceed with the script.
- Create a new folder for your script files. For example: auctionScraper
- Create a new folder in the folder you created in the step above, name it “tempFolder”.
- Add files from your Chrome data directory (%LOCALAPPDATA%\Google\Chrome\UserData) to the “tempFolder”.
- Create new files like this:
- index.js
- package.json
JS codes for index.js (Don’t forget to edit necessary fields <YOUR-CLOUD-BUCKET-NAME>, report url (urlVisit), <YOUR-CLOUD-PROJECT-ID>)
const puppeteer = require('puppeteer-extra');
const StealthPlugin = require('puppeteer-extra-plugin-stealth');
puppeteer.use(StealthPlugin());
const fs = require('fs');
const { Storage } = require('@google-cloud/storage')
const request = require('request');
const bucketName = "<YOUR-CLOUD-BUCKET-NAME>"
exports.auctionScraper = async(req, res) => {
    //Default Auction Insights report URL. Get it from your Ads UI > Reports > Auction Insights
    var urlVisit = "https://ads.google.com/aw/reporting/reporteditor/view?ocid=1022000&reportId=933615822&euid=563803870&__u=5444835630&uscid=112849000&__c=1508801000&authuser=0&subid=ALL-tr-et-g-aw-c-home-awhp_xin1_signin%21o2-ahpm-0000000082-0000000000"
    if (req.body) {
        if (JSON.parse(req.body).url) {
            //has custom report URL on payload
            urlVisit = JSON.parse(req.body).url
        }
    }
    //Initialize Puppeteer
    const browser = await puppeteer.launch({
            headless: true,
            ignoreHTTPSErrors: true,
            userDataDir: './tempFolder',
            args: [
                '--no-sandbox',
                '--disable-setuid-sandbox',
                '--disable-infobars',
                '--window-position=0,0',
                '--disable-features=site-per-process',
                '--ignore-certifcate-errors',
                '--ignore-certifcate-errors-spki-list',
                '--user-agent="Mozilla/5.0 (Windows NT 10.0; Win64; x64) AppleWebKit/537.36 (KHTML, like Gecko) Chrome/93.0.4577.0 Safari/537.36"'
            ]
        })
        //Open the page
    const page = await browser.newPage();
    //Set default timeouts
    page.setDefaultNavigationTimeout(600000)
    page.setDefaultTimeout(600000)
    var x = 1
    await page.goto(urlVisit, { waitUntil: 'domcontentloaded' })
    await page.waitForFunction("document.querySelector('.filter-list-icon') && document.querySelector('.filter-list-icon').clientHeight != 0");
    await page.setRequestInterception(true);
    page.on('request', request => {
        if (request.url().indexOf("awn-report-download") >= 0)
            request.abort();
        else
            request.continue();
    });
    await page.waitForTimeout(300);
    const dateItem = await page.waitForSelector('.date-picker-container .dropdown-and-comparison')
    await dateItem.click()
await page.waitForTimeout(300);
//Click “Last 7 Days” > to change frequency, modify below:
    const last7Days = await page.waitForSelector('.preset-list .group.preset-container .item:nth-child(5)')
    await last7Days.click();
    await page.keyboard.press('Enter');
    await page.waitForTimeout(300);
    try {
        const applyBtn = await page.waitForSelector('.apply-bar .apply', {
            timeout: 3000
        })
        await applyBtn.click()
    } catch (err) {}
    await page.waitForFunction("document.querySelector('.download-icon') && document.querySelector('.download-icon').clientHeight != 0");
    const downloadBtn = await page.waitForSelector('.download-icon')
    await downloadBtn.click()
    await page.waitForTimeout(300);
    await page.waitForFunction("document.querySelector('.download-dropdown .item:nth-child(5)') && document.querySelector('.download-dropdown .item:nth-child(5)').clientHeight != 0");
    const downloadDropdown = await page.waitForSelector('.download-dropdown .item:nth-child(5)')
    await downloadDropdown.click()
    const finalRequest = await page.waitForRequest(
        (request) => {
            if (request.url().indexOf("awn-report-download") >= 0) {

                return request
            }
        }
    );
    var body = {
        url: finalRequest.url(),
        type: JSON.parse(req.body).type
    }
    const gcs = new Storage({
        projectId: '<YOUR-CLOUD-PROJECT-ID>'
    });
    var theURL = body.url
    var theTYPE = body.type
    const bucket = gcs.bucket(bucketName);
    var file = bucket.file("report_" + theTYPE + ".csv.gz");
    var x = await new Promise((resolve, reject) => {
        const requ = request(theURL);
        requ.pause();
        requ.on('response', resu => {
            const exist = file.exists().then(function(data) {
                return data[0]
            });
            const writeStream = file.createWriteStream({
                metadata: {
                    contentType: resu.headers['content-type']
                }
            });
            requ.pipe(writeStream)
                .on('finish', () => {
                    resolve("ok");
                })
                .on('error', err => {
                    writeStream.end();
                    console.error(err);
                    reject();
                });
            requ.resume();
        });
        requ.on('error', err => console.error(err));
    });
    if (x) {
        res.sendStatus(200)
    }
}
package.json
{
    "name": "auctionscraper",
    "version": "1.0.0",
    "description": "",
    "main": "index.js",
    "engines": {
        "node": ">=16.0.0"
    },
    "scripts": {
        "test": "echo \"Error: no test specified\" && exit 1",
        "start": "functions-framework --target=auctionScraper --trace-warning"
    },
    "author": "",
    "license": "ISC",
    "dependencies": {
        "@google-cloud/functions-framework": "^2.1.0",
        "@google-cloud/storage": "^5.16.1",
        "puppeteer": "^13.3.2",
        "puppeteer-extra": "^3.2.3",
        "puppeteer-extra-plugin-stealth": "^2.9.0",
        "request": "^2.88.2"
    }
}
At the end, you should have the following files and folders in your script folder: tempFolder, index.js, package.json
Then you can compress these files to prepare your script for deployment on Google Cloud Functions. Your compressed file should have this structure:
scriptFiles.zip >
      tempFolder
      index.js
      package.json
It’s important to keep this structure valid, otherwise you may get some errors when uploading files to Google Cloud Functions. You can now navigate to https://console.cloud.google.com and create a new Cloud Function with the settings below:
- Function Name: auctionScraper
- Trigger Type: HTTP (Allow unauthenticated invocations)
- Memory: 2 GB
- Timeout: 540
- Runtime: NodeJS 16
- Entry point: auctionScraper
- Source Code: ZIP Upload (upload the zip file you already prepared.)
Deploy your function. This function will fetch the download link for the last 7 days auction reports (you can change it in the script) from Google Ads UI and download the report to a bucket you specify. The next step is to write the content of the report into the BigQuery.
Importing report file to BigQuery (NodeJS Script)
The first step was to download the reports from Google Ads to the Storage Bucket. Now this process is complete, we can move on to the next step: Importing the downloaded compressed csv file (.csv.gz) into the Google BigQuery Table.
- Create a new folder for your script files. For example: auctionScraper_automation
- Create new files inside this folder like this:
- index.js
- package.json
JS codes for index.js (Don’t forget editing necessary fields <CLOUD-PROJECT-ID> and <DATA-SET-ID>)
const projectId = "<CLOUD-PROJECT-ID>"
 const dataSet = "<DATA-SET-ID>"
 const tableSuffix = "_AuctionInsightReport"
 const { BigQuery } = require('@google-cloud/bigquery');
 const { Storage } = require('@google-cloud/storage');
 const storage = new Storage();
 const bigquery = new BigQuery({ projectId: projectId });
 exports.sendToBigQuery = (event, context) => {
     const gcsEvent = event;
     async function loadCSVFromGCS() {
         const metadata = {
             sourceFormat: 'CSV',
             skipLeadingRows: 3,
             compression: "GZIP",
             autodetect: true,
             writeDisposition: "WRITE_APPEND"
         };
         const [job] = await bigquery
             .dataset(dataSet)
             .table("keywords" + tableSuffix)
             .load(storage.bucket(gcsEvent.bucket).file(gcsEvent.name), metadata);
         const errors = job.status.errors;
         if (errors && errors.length > 0) {
             throw errors;
         }
     }
     if (gcsEvent.name.indexOf("report_") >= 0) { loadCSVFromGCS(); }
 };
Here, it’s important to intervene as little as possible in the file and send it to BigQuery, because the report sizes can be very large for large customers. This eventually causes our function to time out. So it seems that we aren’t able to process this .csv file line by line. Therefore, we use the “auto-detect” function of the BigQuery schema. The schema for the table is created automatically by detecting the data types of the columns.
package.json file
{
  "name": "auctionScraper_automation",
  "version": "0.0.1",
  "dependencies": {
    "@google-cloud/storage": "*",
    "@google-cloud/bigquery" : "*"
  }
}
At the end, you should have the following files and folders in your script folder: tempFolder, index.js, package.json
Then you can compress these files to prepare your script for deployment on Google Cloud Functions. Your compressed file should have this structure:
scriptFiles.zip >
      index.js
      package.json
You can now navigate to https://console.cloud.google.com and create a new Cloud Function with the settings below:
- Function Name: auctionScraper
- Trigger Type: CloudStorage
- Event Type: Finalize/Create
- Bucket: Select bucket name you specified at previous script (where your reports downloaded)
- Memory: 2 GB
- Timeout: 540
- Runtime: NodeJS 16
- Entry point: sendToBigQuery
- Source Code: ZIP Upload (upload the zip file you prepared already.)
Deploy your function. Now, every time a new file is downloaded to your bucket by the previous script, this function is triggered to send its contents to the BigQuery table.
Google Ads Scripts: Download the Auction Insight Data
After our setup is ready to download the report from ads UI and send it to BigQuery, the next step is to do this automatically every week. The cloud schedule option can also be used, but we preferred Google Ads Script for this solution.
- Navigate to https://ads.google.com/aw/bulk/scripts
- Create a new script with the following code and name it as you wish.
Ads script code:
var REPORT_SCRAPER_URL = "<your http trigger url for first google cloud function (auctionScraper)>"
var body ={
"url": "url of auction insight report page",
"type" : "keywords"
}
function main() {
      callCloudFunc()
}
function callCloudFunc(){
   var options = {
        muteHttpExceptions: true,
        contentType: "text/plain",
        payload: JSON.stringify(body)
    }
  var response = UrlFetchApp.fetch(REPORT_SCRAPER_URL, options);
        if (response.getResponseCode() == 200) {
        }
        else{
         callCloudFunc()
        }
}
- Schedule script for the weekly run.
It fetches the Auction Insights report from Google Ads UI every week, loads it into the storage, and writes the content to BigQuery. This will keep your data up to date on a weekly basis.
Fetching older auction insight data in bulk
The ad script is now ready. Once it’s working, it’ll regularly download the Auction Insight report each week and add the data to our BigQuery table. But what if I want older data in my table as well? For example, the data from the last two years?
Our cloud function auctionScraper will get a time-out when processing these files, because the data for a 2-year report is probably very large.
Waiting for this report to be generated in Google Ads UI is the longest part of the job, sometimes it can take more than 10 minutes. Unfortunately, there isn’t much we can do about it, because this report is completely created by Google. And when it’s ready, we can access the link of the report, so it’s unlikely that we’ll use the auctionScraper feature in this action. But we can work around this issue with our other function, “auctionScraper_automation”. As you remember, this function has nothing to do with other scripts. It simply waits for the file upload in the specified bucket and then is triggered to write the contents of the uploaded file to the BigQuery.
What should our solution be for large reports?
- Navigate to Google Ads UI, open your Auction Insights report.
- Filter and set the date range for the report to your liking (e.g., last 2 years).
- Click the “Download” button and download the report in .csv.gz format.
- It’ll take some time for Google to prepare your report. Once your report is ready, the download process will begin.
- Wait until the download is completed.
- Rename your report to: report_keywords<any_number>.csv.gz For example: report_keywords1.csv.gz (The number here isn’t so important, it’s just for control and shouldn’t to mess up the processed files.)
- Navigate to your cloud console.
- Open the bucket you created in the previous steps to save the reports.
- Drag and drop the recently downloaded and renamed report or upload it to this bucket.
- Done! The auctionInsight_automation script is triggered after the upload is complete and writes the report data to the BigQuery.
Trouble to set up your own solution?
Don’t have a developer in your marketing and having trouble setting up the solution? We can set up and maintain Auction Insight Exporter for you. If you’re interested, feel free to contact us. We also have a lot of other solutions for automating things in Google Ads.